Rules used are Blitzkrieg Commander II by Specialist Military Publishing.
Notes on BKC II Optional Rules and Scenario Rules used are at the end of this Post.
This scenario is set at the beginning of Operation Barbarossa in June 1941 and is a Soviet counterattack against a German position with German reinforcements on the way. Standard stuff.

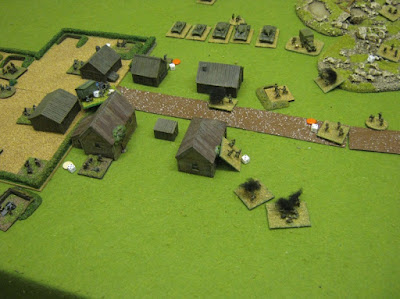
Here's the initial layout.
The Germans are defending in the west and the Soviets are attacking from the east.
The woods, hills, village and hedges are treated as normal.
The rough ground in the foreground I treated as Low Area terrain for visibilty, Impassable to vehicles and guns and Soft Cover.
Objectives
Soviets - to breakthrough and exit the table along the west edge which is held by the Germans. They must also contest the village, which means occupying at least one sector, so they can't just ignore everything and charge off.
Germans - to destroy any enemy that attack your sector.
Soviets - to breakthrough and exit the table along the west edge which is held by the Germans. They must also contest the village, which means occupying at least one sector, so they can't just ignore everything and charge off.
Germans - to destroy any enemy that attack your sector.
OOBs
... are long and in the downloads mentioned in my previous Post - Blitzkrieg Commander II revival.
You will get an idea from the piccies.
... are long and in the downloads mentioned in my previous Post - Blitzkrieg Commander II revival.
You will get an idea from the piccies.
- Germans start with one infantry battalion, one FlaK battalion and one StuG formation. Reinforcements are on the way.
- Soviets have three infantry battalions, two tank battalions and an off-table artillery battalion. Not all the Soviets listed are guaranteed to turn up.
The Soviets start off-table along the east edge, nominating a start point for each formation.

I put the infantry defending the village and farming area. The StuGs are off to the right behind the rough ground.

The FlaK battalion are around the north hill behind the wood.
Pre-planned Artillery
Playing this solo I hit the problem of having pre-planned artillery for the Soviets while knowing where the Germans were deployed. I came up with a solution which I thought worked quite well.
 |
| I ended up with two x 152mm strike points in the village, one 122mm hitting the hill occupied by the FlaK battalion and one 122mm blasting away at the rough ground |
The scenario states that having planned your artillery, you roll a d6 for each gun and on a one it takes no part in the game. I lost 2 strike points as a result.
I ended up with two x 152mm strike points in the village, one 122mm hitting the north hill occupied by the FlaK battalion and one 122mm blasting away at the rough ground. Not bad, I thought.
The Game
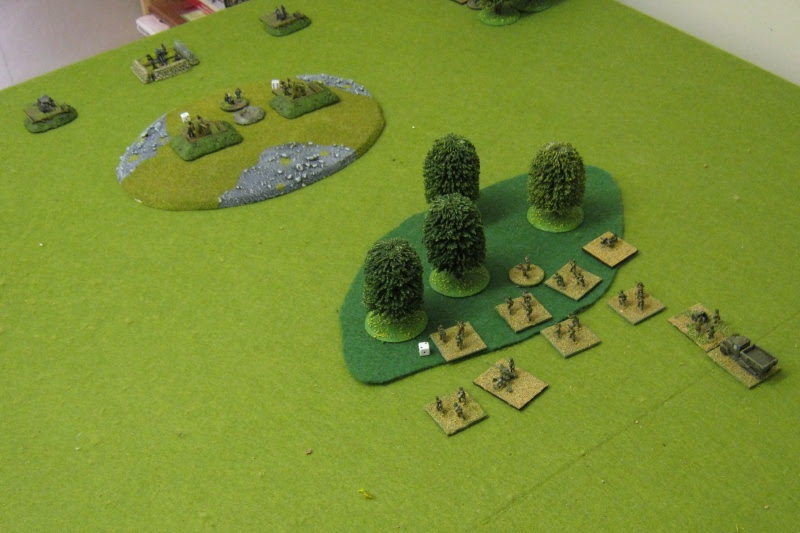
Due to the randomising of Soviet arrivals only one infantry battalion moved off initially. The StuG formation saw an opportunity to intercept them and started to move round the rough ground to meet them.
 |
| "Hmmm - nice soft targets" |
More Soviets enter the scene and advance rapidly.

This gives the StuGs a fright, but they are committed now. It's fight or flee.
They fight.

This gives the StuGs a fright, but they are committed now. It's fight or flee.
They fight.
 |
| The StuGs destroy two infantry stands. |
In the village, artillery has started landing on four sectors. The German CO orders the infantry to abandon the buildings and take cover nearby.
The two 88s on the hill don't have the luxury of moving and have to endure the barrage.
The Russian tanks cannot ignore the StuGs killing their supporting infantry and turn to face them.
The StuGs are taking a hammering, but suddenly - WHAM - one of the Russian tanks on the central hill explodes.
This is followed by two more. The 88s around the north hill have opened up.
Further north, one Soviet infantry battalion get into the woods in front of the 88s on the hill.

The Russian tanks on the north flank have only just got moving. They nearly didn't turn up.
The StuGs destroyed, Soviet attention turns back on the village, but keeping behind the hill away from the 88s.

The German CO has realised that the artillery barrage has stopped and he needs to get his troops back into the village. Can he do it in time?

In the north, the infantry have made it through the woods just as the tank battalion moves past it, straight into the 88s. The 88s hit the tanks but opportunity fire from the Russian infantry finishes one of them off.
The 2nd 88 on the hill is put out of action and the infantry advance. There's still an 88 and some 20mm Flak units behind the hill. The Soviet tanks have failed their Command Roll to support the infantry.

Honestly, this is how it happened - The first German reinforcements turned up in the corner after being delayed for two turns. A Recce battalion with armoured cars, guns and PzJagers.
With the Recce battalion holding them back and the FlaK battalion killing them, this is getting difficult for the Russians.

The German infantry have made it back into the village, but the Russians are coming.

The tanks have to advance right up to the village before they can see and react to the German infantry. But when they do they hit them hard, killing two units on the outskirts of the village. Supporting Soviet infantry moving through the rough ground are ready to charge in to the village.

On a double one the infantry get a foothold in the village. This is one part of the victory conditions for the Russians. They also need to exit the table from the western edge with as many formations as possible.
The FlaK battalion let down the Recce battalion and the light armour of the armoured cars and PzJagers is no match for the Russian tanks.

Soviet infantry crest the hill and come under opportunity fire but inflict more casualties on the Recce battalion causing them to quit the field.

Just as the Recce battalion flees, more Germans turn up. A heavily armed formation of engineers in half-tracks supported by various artillery units including a Wurfrahmen and a FOO for off-table artillery.
The tank battalion bypasses them off the table leaving the infantry to their fate...

... which comes quickly. The new arrivals move south to try to cut off the Russians at the far end of the village.

At the village, the Soviet infantry battalion in the centre has been destroyed.

In the south the Russians have emptied another village sector and are closing in.

The Germans' puny anti-tank rifles are having no effect on the Russian tanks and they turn all their attention on the Russian infantry occupying village sectors.
They just managed to finish off the Russian infantry as the tanks head for the table edge.
With the last of their infantry in rout, the Russian tanks can not exit the table and also hold any village sectors. One more lost tank and they rout anyway.

Winners and Losers
I don't often count Victory Points because enjoying the game, and coming to a mutual agreement, is more important to me than who won mathematically, but here goes.
According to the scenario, the Germans get 1 Victory Point for each Russian formation destroyed.
The Russians get 3VPs for each tank battalion, and 2VPs for each infantry battalion, that leave the table by the western edge.
So that would be 3VPs to the Germans and 6VPs to the Russians.
But the Russians also have to hold at least one village sector, which they don't. As the Russians don't hold any village sectors they can't win.
Thoughts
Well, I enjoyed that game. It was quite a big game, and it's been a while since I played BKC II, so it took a while but it was worth it. No doubt I made some mistakes and missed some opportunities, but it felt about right.
The random arrival times of the Soviet forces are an intended effect of the scenario and worked quite well. Under the scenario, it's possible that some of the Soviet forces don't turn up. They would have struggled in this game if that had happened.
As this game turned out so well I'll be moving on to the second scenario in the series very soon.
Notes on BKC II Optional Rules and Scenario Rules used
 |
| German infantry abandon the buildings under artillery fire. |
The two 88s on the hill don't have the luxury of moving and have to endure the barrage.
 |
| Hits from artillery fire mount on the two 88s on the north hill. |
The Russian tanks cannot ignore the StuGs killing their supporting infantry and turn to face them.
 |
| Russian tanks face the StuGs. Overkill perhaps, but split a Russian formation at your peril. |
The StuGs are taking a hammering, but suddenly - WHAM - one of the Russian tanks on the central hill explodes.
 |
| The StuGs are fighting a losing battle. But seemingly out of nowhere, one of the tanks on the hill blows up. |
This is followed by two more. The 88s around the north hill have opened up.
 |
| The Soviet tanks on the hill are blowing up. |
Further north, one Soviet infantry battalion get into the woods in front of the 88s on the hill.
The Russian tanks on the north flank have only just got moving. They nearly didn't turn up.
 |
| One more failed roll for arrival and they wouldn't have turned up. |
The StuGs destroyed, Soviet attention turns back on the village, but keeping behind the hill away from the 88s.

The German CO has realised that the artillery barrage has stopped and he needs to get his troops back into the village. Can he do it in time?

In the north, the infantry have made it through the woods just as the tank battalion moves past it, straight into the 88s. The 88s hit the tanks but opportunity fire from the Russian infantry finishes one of them off.
 |
| Perhaps I should have put the 20mm FlaKs in front of the hill Units with biege markers have used Opportunity Fire or Initiative Units with orange markers are Suppressed |
The 2nd 88 on the hill is put out of action and the infantry advance. There's still an 88 and some 20mm Flak units behind the hill. The Soviet tanks have failed their Command Roll to support the infantry.

Honestly, this is how it happened - The first German reinforcements turned up in the corner after being delayed for two turns. A Recce battalion with armoured cars, guns and PzJagers.
 |
| OK, so two of the PzJagers are actually PzIs. |
With the Recce battalion holding them back and the FlaK battalion killing them, this is getting difficult for the Russians.

The German infantry have made it back into the village, but the Russians are coming.

The tanks have to advance right up to the village before they can see and react to the German infantry. But when they do they hit them hard, killing two units on the outskirts of the village. Supporting Soviet infantry moving through the rough ground are ready to charge in to the village.

On a double one the infantry get a foothold in the village. This is one part of the victory conditions for the Russians. They also need to exit the table from the western edge with as many formations as possible.
 |
| The Russians occupy one sector of the village and now need to get as many units off the table as possible. |
The FlaK battalion let down the Recce battalion and the light armour of the armoured cars and PzJagers is no match for the Russian tanks.

Soviet infantry crest the hill and come under opportunity fire but inflict more casualties on the Recce battalion causing them to quit the field.

Just as the Recce battalion flees, more Germans turn up. A heavily armed formation of engineers in half-tracks supported by various artillery units including a Wurfrahmen and a FOO for off-table artillery.
The tank battalion bypasses them off the table leaving the infantry to their fate...

... which comes quickly. The new arrivals move south to try to cut off the Russians at the far end of the village.

At the village, the Soviet infantry battalion in the centre has been destroyed.

In the south the Russians have emptied another village sector and are closing in.

The Germans' puny anti-tank rifles are having no effect on the Russian tanks and they turn all their attention on the Russian infantry occupying village sectors.

They just managed to finish off the Russian infantry as the tanks head for the table edge.
With the last of their infantry in rout, the Russian tanks can not exit the table and also hold any village sectors. One more lost tank and they rout anyway.

Winners and Losers
I don't often count Victory Points because enjoying the game, and coming to a mutual agreement, is more important to me than who won mathematically, but here goes.
According to the scenario, the Germans get 1 Victory Point for each Russian formation destroyed.
The Russians get 3VPs for each tank battalion, and 2VPs for each infantry battalion, that leave the table by the western edge.
So that would be 3VPs to the Germans and 6VPs to the Russians.
But the Russians also have to hold at least one village sector, which they don't. As the Russians don't hold any village sectors they can't win.
Thoughts
Well, I enjoyed that game. It was quite a big game, and it's been a while since I played BKC II, so it took a while but it was worth it. No doubt I made some mistakes and missed some opportunities, but it felt about right.
The random arrival times of the Soviet forces are an intended effect of the scenario and worked quite well. Under the scenario, it's possible that some of the Soviet forces don't turn up. They would have struggled in this game if that had happened.
As this game turned out so well I'll be moving on to the second scenario in the series very soon.
Notes on BKC II Optional Rules and Scenario Rules used
- I used the Static Hits (Hits Stay On) optional rule which I much prefer. Taking hits off at the end of each turn makes infantry in trenches, or other hardcover, extremely difficult to kill.
- I didn't use the Auto-Suppression optional rule which would have stopped the German infantry under artillery fire from abandoning the village.
- The scenario author suggests having some morale mechanism based on each formation, so that some formations don't just fight to the last man. I simply routed a formation that came below half-strength. I might consider a dice throw mechanism at some point.
- He also suggests a limit on visibilty, particularly to see units that have not fired. I tried using a visibilty limit of 50cm to see troops in the open that have not fired. All other visibility stayed as the original rules. It worked OK in this scenario but probably needs refinement.
- Another he suggests for this scenario is that the Soviet formations advance at full speed until they encounter the enemy, which I did.
Great AAR Colin and am really looking forward to the next game:
ReplyDeleteThanks very much Steve.
DeleteNext time, the Germans attack the Stalin Line.
Thanks a lot Andy.
ReplyDeleteI have shared your post on the Commander Series forum.
ReplyDeletehttp://www.blitzkrieg-commander.com/Content/Forum/Topic.aspx?CategoryID=2&ForumID=9&TopicID=18764&ForumPage=1
Cheers
Richard P
Thanks for sharing it Richard, and for the positive comment with it.
DeleteWhat a great response this is getting. Good to see there are still so many BKCII fans out there.
I'm just getting the second scenario in the series set up.
Well done Colin, an excellent report. We need to get a couple of BKC games going sometime soon.
ReplyDeleteThanks Graham. Yes, we'll sort something out soon.
DeleteThanks - following.
ReplyDelete:)
Delete